Saturday, December 29, 2012

Making Chocolate "Bark"

Hi!! I hope everyone had a great holiday season!

Today, I'm going to switch it up and show you how to make bark, which is this delicious chocolate goody. Just in time to make for New Years before we all start our diets. This is great because you can put whatever you want in it.

What you'll need:


  • Cookie sheet with lips
  • Parchment paper or waxed paper
  • Spatula 
  • 2 bags of chocolate chips (approx. 11.5 oz each or the equivalent of 4 cups)
  • Stuff to put in the bark. I used:
    • Pretzel sticks
    • Peanuts
    • Peanut M&Ms
    • Regular M&Ms
  • Empty shelf in the fridge
  • Double boiler - deep pot and shallow pot that are the same circumference.
 Step 1:
Start by making a  "double boiler." This is wicked easy. All you need is a big, deep pot and a shallower pot that fits on top.

Fill the large pot halfway with water. Bring to a boil with the shallower pot on the top to heat up.

Step 2:

While the water is heating up, prepare your stuff. In a bowl, I mixed all the goodies together; the M&Ms and peanuts, and pretzels. I also lined the cookie sheet with parchment paper. This step will be important later.

 Step 3:

Once the water is boiling, empty both bags of chips into the shallow pan on top, stirring the chips so that they melt evenly.
Step 4:

Once the chips have completely melted, pour the chocolate into the pan, spreading and evenly distributing it. Save a little chocolate in the pot for step 7.

Step 5:

Immediately after step 4, drop your mixture of goodies into the chocolate. The chocolate starts to harden fast, so you have to be quick.

Step 6: (optional)

If you did not put enough stuff in the bowl, you can just put more stuff into the chocolate. I used half a (big) bag of both M&Ms, 3/4 of a can of peanuts and a couple handfuls of pretzel sticks. I did break the pretzel sticks up into halves or thirds because they are so long.
Step 7: 

Once you have finalized you placement of goodies, use the left over chocolate from step 4 to drizzle over the top to hold everything in.
Step 8:

Put it in the fridge and let harden for an hour or so and then break into pieces. If you value your hands, do not try to use a knife to do this. Use clean hands to do this.

Enjoy!

xoxo g

Tuesday, November 13, 2012

10 Dollar Mall!

If you're a reader of my blog, then you'll know that I love a bargain. If a deal can be found, I can find it. I'm a girl, and I love clothes. I love to shop and I get a high when I find a hot top or the perfect pair of jeans. One day I was searching for cheap clothing websites - and I don't mean cheap quality, just cheap prices. I stumbled upon 10 Dollar Mall
What?! Everything is $10 bucks or less! That is my kind of shopping. So I started looking around the site, and they sell everything! Juniors clothes, plus sizes (perfect for me!), mens, kids and accessories! Have I died and gone to heaven? Yes, yes I have.

I have bought so much from 10 Dollar Mall that I get a package at least once a week. They always have new items and the stuff just gets better and better!

Now, I know what you're thinking: cheap prices mean cheap quality. WRONG. You are so wrong. 10 Dollar Mall clothes are not only super cute and affordable, but they're high quality, too! I beat the crap out of clothes, wearing them, washing them, throwing in the dryer, but not once has one thing I have bought from 10 Dollar Mall been destroyed or shrunk or even look worn. All of my stuff looks brand new, including my favorite shirt from there that I wear at least once a week and wash every time I wear it. The quality is out of this world! Wash it, throw it in the dryer and put it on! When my dogs jump on me, I always expect to get pulls or holes in my clothes, but never has anything I have bought from 10 Dollar Mall ever gotten destroyed by my two dogs.

There clothes are so cute! Just tonight I was shopping around when I came across the cutest cardigans! I am a sucker for a cardigan and these were adorable! I mean, come on, it's pink AND sparkly! I am definitely buying this dress! How cute is that? Perfect for going out to dinner with your beau or hanging out with the girls! This skirt is definitely coming home to my house. I'll feel like a ballerina in it. :) How fun is this sequin dress? It's pink and sparkly, one of my first rules of fashion. ;)

Did I mention that if you "like" 10 Dollar Mall on Facebook, you get 3% off your order? No? Well, you do. And every time you tweet, you get 3% off. Bargains on top of bargains. Gotta love it.

Happy shopping!!
xoxo g

Wednesday, October 24, 2012

Becoming Poison Ivy (Halloween costume)

So this Halloween season, my team and I decided that we were going to go as DC super hero's. Being late to the party, I was left with Batgirl, or Catgirl or some other lame "good girls." It's Halloween, that means dressing like a hoe and getting away with it. So let's begin the hoe-ification of a good girl.

Inspiration:

I googled her, and took my inspiration from every interpretation that I found. I saw LEAVES. Tons and tons of leaves.


My costume consists of and what you'll need


*A TON of fake leaves (I had to make several trips to the buck store)
*A corset
*Some spandex shorts
*Green ribbon
*Black tights
*Glue gun and glue sticks
*Sissors
* Loose glitter - green
*Spray glue
*Glitter glue - green
*Anything green I could get my hands on.
*Dollar store place mat - black
*Black headband 

Lets start with the simple and one of the most time consuming: taking apart the leaves.

Step 1 -
Depending on where and what your leaves look like, chances are they're on some plastic sword things that you can poke someone's eye out with. You don't need that junk.

There are two ways you can do this (I used both):

1. Cut the leaves off at the base of the leaf, leaving the plastic backing on. This makes them stiff and pop more, so you'll have more of a 3D effect.

OR

2. Gently peel the leaves off the stems. 

Step 2 -optional

I thought it would be cool if I individually painted the leaves with the glitter glue, and I realized what a waste of time it was once I started to put it together. You can paint them if you'd like, but you'll see later why you don't have to. 
Step 3 - Corset

I have a black corset because I wanted my PI to be a little bit edgier than normal and black is the easiest to come by. 
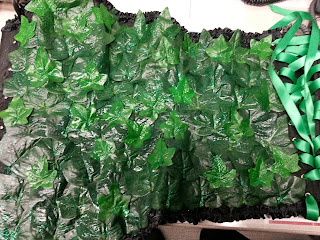
I had no plan for placing the leaves. I didn't want a pattern so I just started place the large leaves all over it, using my hot glue gun. Then I took the smaller leaves and glued them to the spots that the large leaves couldn't cover. 

Then I took my green glitter glue and using my sponge brush, I just wiped it all over it.


It's hard to see the sparkles in the pictures.

Complete on both sides
Lace the back with the green ribbon. *Use the original ribbon that came with the corset as the guide to how much you'll need. It's better to have more than not enough. You can always cut it.


Step 4 - Shorts

For the bottoms, I just used a black pair of spandex shorts I had and glued a few leaves to it and then attacked them with my glitter glue. 

Step 5 - Glitter tights

Aerosol spray glue 
and 
Loose glitter
Take a pair of tights in your choice of color. Using newspaper or anything you can bunch up, fill the legs of the tights with it so the tights don't stick together. 
*Spray the tights with the glue and shake on glitter. Cover with coat of glue
*Let dry one hour
*flip over and do the other side.
*Let dry


Step 6:

I made shoes, a clutch and a headband to go with it.

 The shoes are just cheap black flats from walmart

The clutch is a placemat from the dollar store. :) I'm going to put a magnetic strip on the inside so it will stay closed and probably a strap so it's a wristlet. Better for dancing, my dears.


The headband is a cheap black sparkly headband I got on the dollar rack at Joann's. I used my glitter glue and then hot glued some smaller flowers to it.

Monday, October 22, 2012

DIY Fake Tan

Hey! So I' m pale, really pale, and I don't like tanning beds or anything. Plus I'm on a budget so... I made fake tan.
What you'll need:


-Bottle of thick lotion
-Dark colored foundation - mine are tan and cocoa. I'm using two because I couldn't find a shade in the middle. If you have a shade that you like, you can use just one too. 


Step one:
Time to play mad scientist: Add a few drops of the lighter of the two to the lotion.


Step two:
Shake

Step three:
Test.

Step four:
Add more foundation if too light, and repeat 1-3.


*Remember, you can always add color, so add carefully.


*now you can decide how light or dark you want this. Continue to add foundation until you've reached your shade. I kept testing on my arm. This washes off every time you shower so you'll need to put it on daily.
Still, pretty cool if you're going out or something. Best part: Since you're using face-based products, you won't look orange :)

Also, I think I'm going to add body shimmer.
Ooh la la
Xoxox g ♥

Friday, October 5, 2012

Halloween Spook Preview!

Hello, all you beautiful people! I know it's been awhile! I've been super busy with school and work, but I'm making a slow and steady come back. I have a few projects in the works. Anyways, here's a sneak preview of my Halloween costume...

What could it be?? There's lots of green tulle! Yes, yes. I am a tool. Tulle for a tool. Anyways. Sit tight and kept an eye out for this spooktacular skirt! :)

Xoxox g ♡


Sunday, August 26, 2012

DIY Cheap and Easy! Jewelery Cleaner


Hiii! If you made the Earring Holder, chances are you're going to have to clean your earrings before you put them on display. So here's a cheap and easy solution to make them sparkle! This is great for silver and costume jewelery with rhinestones and diamonds in general.

What you'll need:
  • Glass
  • 3 minute denture tablets
  • Water
  • Towel (paper or cloth)

Step One:
          Put all your jewelery that needs to be cleaned in glass, fill with warm water just until everything is covered.

Step Two:
          Drop two tablets into the water.Wait 5-10 minutes. *I usually do this then take a shower, so 10 minutes is fine.


Step Three:
          Once it is done fizzing and getting sudsy, drain the glass over a closed bottom sink, so if anything falls out it won't get washed down the drain.
Step Four:
          Rinse with warm water, repeating step three. Empty glass onto a towel so everything can dry.

That's it! Your jewels should be looking good and feeling fine and ready for their debut on your lace earring holder!


*An alternate way, if your jewels require scrubbing:

What you'll need:

  • Denture tablet
  • Glass
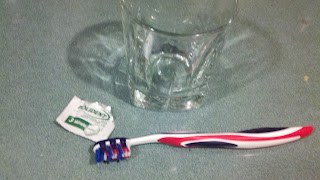
  • Toothbrush
Step One:
          Put about a quarter of an inch of warm water in the glass. Place the tablet in and smash it up.


Step Two:
          Using the toothbrush, dip it in the solution and then gently scrub your jewelery. Rinse with warm water. Dry on towel.

Before:
After:
xoxo g

Earring Holder


Hello! I love this project. It is cheap, easy, fast and makes a great gift! So let's get started!

What you'll need:

  • Embroidery hoop (6-7 inches is a good size)
  • Lace (I had half a yard and had enough to make about 10 of them)
  • Glue gun

Step One:
          Place the inside hoop under the lace. *Since I have a lot of earrings and they're pretty heavy, I decided to double up the lace, using 2 layers. This is purely your choice. I just wanted it to be reinforced.
Step Two:
          Place the larger hoop over the lace and the hoop underneath. Pull the lace taught and tighten the bracket until it is very tight and secure. Pull lace around edges to make sure it is tight.


Step Three:
          Cut the excess lace off, leaving about 1/4th of an inch of lace around the edge of the hoop.

Step Four:
          Using the hot glue gun, glue down the edge to  the hoop for added stability and security.
Step Five:
          Voila! You're all done! Now put your earrings on it, and find a good place to hang it! It looks cute on a wall in your bedroom.
*I made 2, one for me, one for my mother. I used a 7 inch hoop for mine (pink) and a 6 inch hoop for hers (green). Here's the difference:
xoxo g


Sunday, August 19, 2012

DIY "Modge Podge" or Decoupage or Craft Glue


Bonjour! If any of you are seasoned DIY-ers, then you know how expensive Mod Podge is. Did you know that it's just watered down glue? No? Well, it is. So, I want to help you save a few bucks. PS-- I like to call it "modge podge" because that sounds right. Also, "decoupage" because it sounds French and fancy and expensive.
What you'll need:
*Elmer's white glue all
*Air tight jar (mine is a sauce jar)
*Water
Step one:
          Empty whole bottle of glue into the jar.

Step two:
          Add water - you can do a ratio of 1:1 but I wanted mine thicker so I did about 1:3/4


Step three:
          Shake!

Step four:
          Label!

That's it! So easy and it only costs about 2 bucks!
Stay tuned for shoes with decoupage and glitter!! :)

Xoxo g