Sunday, August 26, 2012

DIY Cheap and Easy! Jewelery Cleaner


Hiii! If you made the Earring Holder, chances are you're going to have to clean your earrings before you put them on display. So here's a cheap and easy solution to make them sparkle! This is great for silver and costume jewelery with rhinestones and diamonds in general.

What you'll need:
  • Glass
  • 3 minute denture tablets
  • Water
  • Towel (paper or cloth)

Step One:
          Put all your jewelery that needs to be cleaned in glass, fill with warm water just until everything is covered.

Step Two:
          Drop two tablets into the water.Wait 5-10 minutes. *I usually do this then take a shower, so 10 minutes is fine.


Step Three:
          Once it is done fizzing and getting sudsy, drain the glass over a closed bottom sink, so if anything falls out it won't get washed down the drain.
Step Four:
          Rinse with warm water, repeating step three. Empty glass onto a towel so everything can dry.

That's it! Your jewels should be looking good and feeling fine and ready for their debut on your lace earring holder!


*An alternate way, if your jewels require scrubbing:

What you'll need:

  • Denture tablet
  • Glass
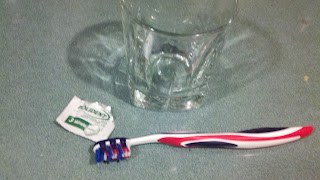
  • Toothbrush
Step One:
          Put about a quarter of an inch of warm water in the glass. Place the tablet in and smash it up.


Step Two:
          Using the toothbrush, dip it in the solution and then gently scrub your jewelery. Rinse with warm water. Dry on towel.

Before:
After:
xoxo g

Earring Holder


Hello! I love this project. It is cheap, easy, fast and makes a great gift! So let's get started!

What you'll need:

  • Embroidery hoop (6-7 inches is a good size)
  • Lace (I had half a yard and had enough to make about 10 of them)
  • Glue gun

Step One:
          Place the inside hoop under the lace. *Since I have a lot of earrings and they're pretty heavy, I decided to double up the lace, using 2 layers. This is purely your choice. I just wanted it to be reinforced.
Step Two:
          Place the larger hoop over the lace and the hoop underneath. Pull the lace taught and tighten the bracket until it is very tight and secure. Pull lace around edges to make sure it is tight.


Step Three:
          Cut the excess lace off, leaving about 1/4th of an inch of lace around the edge of the hoop.

Step Four:
          Using the hot glue gun, glue down the edge to  the hoop for added stability and security.
Step Five:
          Voila! You're all done! Now put your earrings on it, and find a good place to hang it! It looks cute on a wall in your bedroom.
*I made 2, one for me, one for my mother. I used a 7 inch hoop for mine (pink) and a 6 inch hoop for hers (green). Here's the difference:
xoxo g


Sunday, August 19, 2012

DIY "Modge Podge" or Decoupage or Craft Glue


Bonjour! If any of you are seasoned DIY-ers, then you know how expensive Mod Podge is. Did you know that it's just watered down glue? No? Well, it is. So, I want to help you save a few bucks. PS-- I like to call it "modge podge" because that sounds right. Also, "decoupage" because it sounds French and fancy and expensive.
What you'll need:
*Elmer's white glue all
*Air tight jar (mine is a sauce jar)
*Water
Step one:
          Empty whole bottle of glue into the jar.

Step two:
          Add water - you can do a ratio of 1:1 but I wanted mine thicker so I did about 1:3/4


Step three:
          Shake!

Step four:
          Label!

That's it! So easy and it only costs about 2 bucks!
Stay tuned for shoes with decoupage and glitter!! :)

Xoxo g

Wednesday, August 1, 2012

Experiment time: Can I sew a bra into my bathing suit?

It's the summer time, I live near the beach, I like to visit occasionally and next week I'm on vacation! So, in my perilous hunt for a bathing suit, I had one main requirement: I want one with a proper bra, complete with underwire. Shouldn't be so bad, right? Wrong. Because I'm a bit... chesty and curvy (being nice), finding a bathing suit not made for old ladies, that was cute and didn't cost the same as my car, was like finding the infamous white whale (no pun intended for what I look like in the suit.)

Right. Here goes nothing:

What you'll need:

  • Swim suit with saggy cups (those awful, flimsy, no good cloth cups)
  • A bra you don't mind "altering."
  • Several needles
  • Nylon thread
 Step One:
          Line up the bra in the bathing suit to see where everything is going to hit. You want to make sure the underwire (if you're using a bra with one) is inside the front of the bathing suit and doesn't overlap into the back, or go over the seams.  Pin so that you can't see it when you're looking at it from the outside.


Step Two:
          You're not going to stitch where you think you're going to be stitching! Surprise! No, you're not stitching around the perimeter, you're going to stitch the bra to the existing bra in the suit. You will end up with a funny stitch. **When trying the knot for the thread that's going to anchor the stitch, make sure you start the thread so that the knot is on the outside of the real bra, but on the inside of the swimsuit bra. This way the nylon thread won't rub against you and annoy the bejesus out of you.

Step Three:
          Stitch the bra around the perimeter of the suit cup. ***DO NOT stitch to the outside of the suit, you don't want to see the stitching on the outside. You can hold the outside away from the cup and needle so you don't catch it and cause a run. ***Keep checking the front of the suit to make sure you can't see the tops of the bra.

Step Four:
          Stitch the middle of the bra to the inside of the suit with a straight down stitch. (No picture, sorry!)

Step Five: 
         Continue on to the next cup with the same principle as the first. Do not cut off the band of the bra, as you should be able to wear the band without it showing.

 Stitches shown just stitched to the inside bra

Step Six: 
           ***OPTIONAL*** Depending on the cut of your suit, if you have regular tank straps, you can wear your straps like normal.
Mine is a halter, so I cut the straps at the base of the band, right above the back band, sewed them together to form a halter. ***I was able to keep the strap adjusters on the straps because of how they were placed on the front of the straps and not the back. If yours are on the back, you can either cut the straps off completely or measure them and then sew so that they are taut.


I am so completely shocked and proud of myself that I didn't cock this up and make a mess of it. It looks fantastic! You can't even tell it's been sewn in and my boobs sit where they're supposed to be and they won't be flopping around!

I won't subject you to a picture of me in the suit, but you get the gist. Let's go to the beach!!

xoxo g